
Hasn't this come around quickly? In the blink of an eye it is my turn to be Queen of Sheba, sorry Queen Bee. This is the end of July as I write this, and of course it is raining, pouring and we are all on holidays. And what do we do we do on holidays.....?
Sun, sea and ............. take photos of course.

Years ago the camera was saved up for high days and holidays, now we all have I phones or smart phones and this is the year of the selfie. Or maybe it was last year, I avoid selfies, I seem to age 10 years and gain 5 stone, or age 5 years and gain 10 stone in a selfie.

In any case I want photos to be the bee square of my choice. Polaroid photos, or I phone photos if you prefer.
I've been wanting this for a while, and hoping no one else jumped in.
I messaged @bossyoz having admiring her polaroid squares on instagram. She had made her squares as part of her scandibee and contacted her Queen Bee Sigrun. Sigrun gave permission for me to attach her word document and link to the tutorial she used. This is the link to the tutorial she, and now I followed from Capitola Quilter. (unfortunately I can't link up Sigrun's word document, but thank you Sigrun). You might find it easier to follow that tutorial than my interpretation. The group have a very active flickr group, follow this link to check out their photos for inspiration. You can also check them out on instagram #scandibee
Firstly a few guidelines.
I would like you to make me 2 squares, each 12.5", that is 12" square plus seam allowances.
I would like the background to be a solid kona type fabric. I don't mind what colour, feel free to mix the colour background as long as they are from the same base colour, ie light pink, mid pink etc.
I don't mind how many photos are in each 12.5" square, you can have 1 large photo, 4, or 9 as I have. I know time is short and precious, I don't expect you to make 9 photo squares, just because I did. It was just my fabrics lent toward that.
The photos can be straight or tilted, slightly up or slightly down in position
The actual photo can be a square polaroid shape or an oblong shape like an I phone. Just remember to keep the bottom deeper than the sides and top.
The photos can be of anything. Mine are themed. Yours can be whatever you want, themed or random. An animal, a household object or even an abstract concept. Whatever you want. The more variety the better.
I would like you to sign the bottom of one of your photos, either stitch or write your name
Now, the method
these instructions are for 9 photos in a square
cut 9 x 2.5" fussy cut, that means a 2.5" square cut so that the design is the focus, centred and hopefully in its entirety.

cut 1" white strip, wof (width of fabric) or scraps for the sides and top
cut 1.5" white strip, wof for the bottom
as Jesse J sings, everybody move to the left - chain sew the left side of the 2.5" squares to the 1" strip of fabric, scissor cut and press to the dark side
as Jesse J sings, everybody move to the right - chain sew the right hand side of the 2.5" squares to the 1" strip, scissor cut and press to the dark side.


chain sew a 1" strip to the tops of the squares, trim and press as before
chain sew a 1.5" strip to the bottom of the squares, trim and press to the dark side
your squares should now measure roughly 3.5" by 4". Now we trim them to a width of 3" and a depth of 3.5". I used the 1.5" point on the ruler to line up with the middle of the fussy cut. Measure the depth remembering to keep the bottom white bit the deepest. As long as the overall dimensions are the same, and the bottom is the deepest, the photos don't have to be uniformly centred. Remember variety is good. Why do we trim so much fabric off? We want to keep the white crisp and narrow and it is easier to stitch a broader piece of fabric and trim down then stitch a narrow piece.

Now we move on to the fun bit. (?) We need to add the background. This is where it all becomes a bit looser and more free expression, and maybe a little confusing. We want this white squarish piece of fabric to end up as a 4.5" square, so we make it bigger to 5" x 5.5" by adding borders and then trim down to the required size. This is to give us enough fabric to allow us to tilt it whilst keeping the white corners. Or to place it high up, or low down, whatever takes your fancy. If you have loads of solid and want to tilt, then use 2.5" borders, if you are keeping yours straight and are a careful cutter or are feeling parsimonious then you can use 2" borders.

So, cut your borders and sew on the sides first, then the top and bottom. A word of warning. I used a fq and chain sewed all the sides, I quickly realised I wasn't going to have enough fabric, so a little creative unpicking, cutting and sewing was needed. Those with skimpier borders became the "vanilla" squares, the straight up and down evenly centred squares. Those with more generous borders were tilted, and those without any borders were sewn with a deeper pink border.

To tilt the square, I found the best way was to use a square ruler. Make sure the white border is all enclosed in the square. Cut the first angle, then leave the fabric where it is and turn the board to cut the other sides. If you do inadvertently trim off a white corner, don't worry, use it anyway.

When you have trimmed your 9 squares down to 4.5" squares, sew them in 3 rows of 3. Then attach the middle row to the top row and third row on the bottom. Just try and butt up the seams where it seems appropriate.

C'est Finis. Now you have a square which hopefully measures around 12.5"
If you have any hair left on your head and are feeling generous, it would be fantastic if you could send me an extra fussy cut. I can make these into photo squares to create a fantastic random effect. I'll write your name in the corner of this for you.
If you use 4 photos, I suggest you aim for 4 squares each 6.5", which when sewn together should make 12.5".
My macaroon square has photos of macaroons which were fussy cut smaller at 2" to take advantage of the delicate picture. These still end up at 4.5" square, they just have bigger borders. In fact, they look more like the old slides that were on the go in the 1970s, I like that too.

I had admired this macaroon fabric when Vivienne of greenrabbitdesigns used it as dress fabric for one of her gorgeous bunnies. Vivienne was kind enough to send me some. I do love macaroons, I've eaten loads this summer.

I'm also working on some Liberty flower squares. I love Liberty fabric, flowers and gardens.
I'm also sewing some Japanese based photos, I seem to be drawn towards all things Japanese this year.
And what of the Queen of Sheba? Well ............ when I was married 30 years ago, I wanted to walk down the aisle, or walk up the aisle (I was flexible) to the March of The Queen of Sheba by George Friedrich Handel. It was played often in our church as the congregation left. Anyhow, our organist vetoed it, she asked me, who do you think you are? The Queen of Sheba? Apparently I had to remember I was in God's house and walk down the aisle in a humble, modest manner befitting the occasion. No Bridezillas in our church! Now, if I wasn't going to be the centre of attention the day I married, when would I be? Of course I wanted people to look at me, I was the bride! There was no movement on this at all, the Queen of Sheba was no go. So, do this one thing for me. Go listen to the March of the Queen of Sheba on youtube, and come back and tell me how much you like it.
One last thing, my husband says I should mention the most important bit, how he wanders around the house picking up stray threads and bits of fabric. He has a hard life.
Lastly, thank you everybody and I can't wait for the postman to start delivering!
Helen x
Sun, sea and ............. take photos of course.

remember the old brownie box cameras?

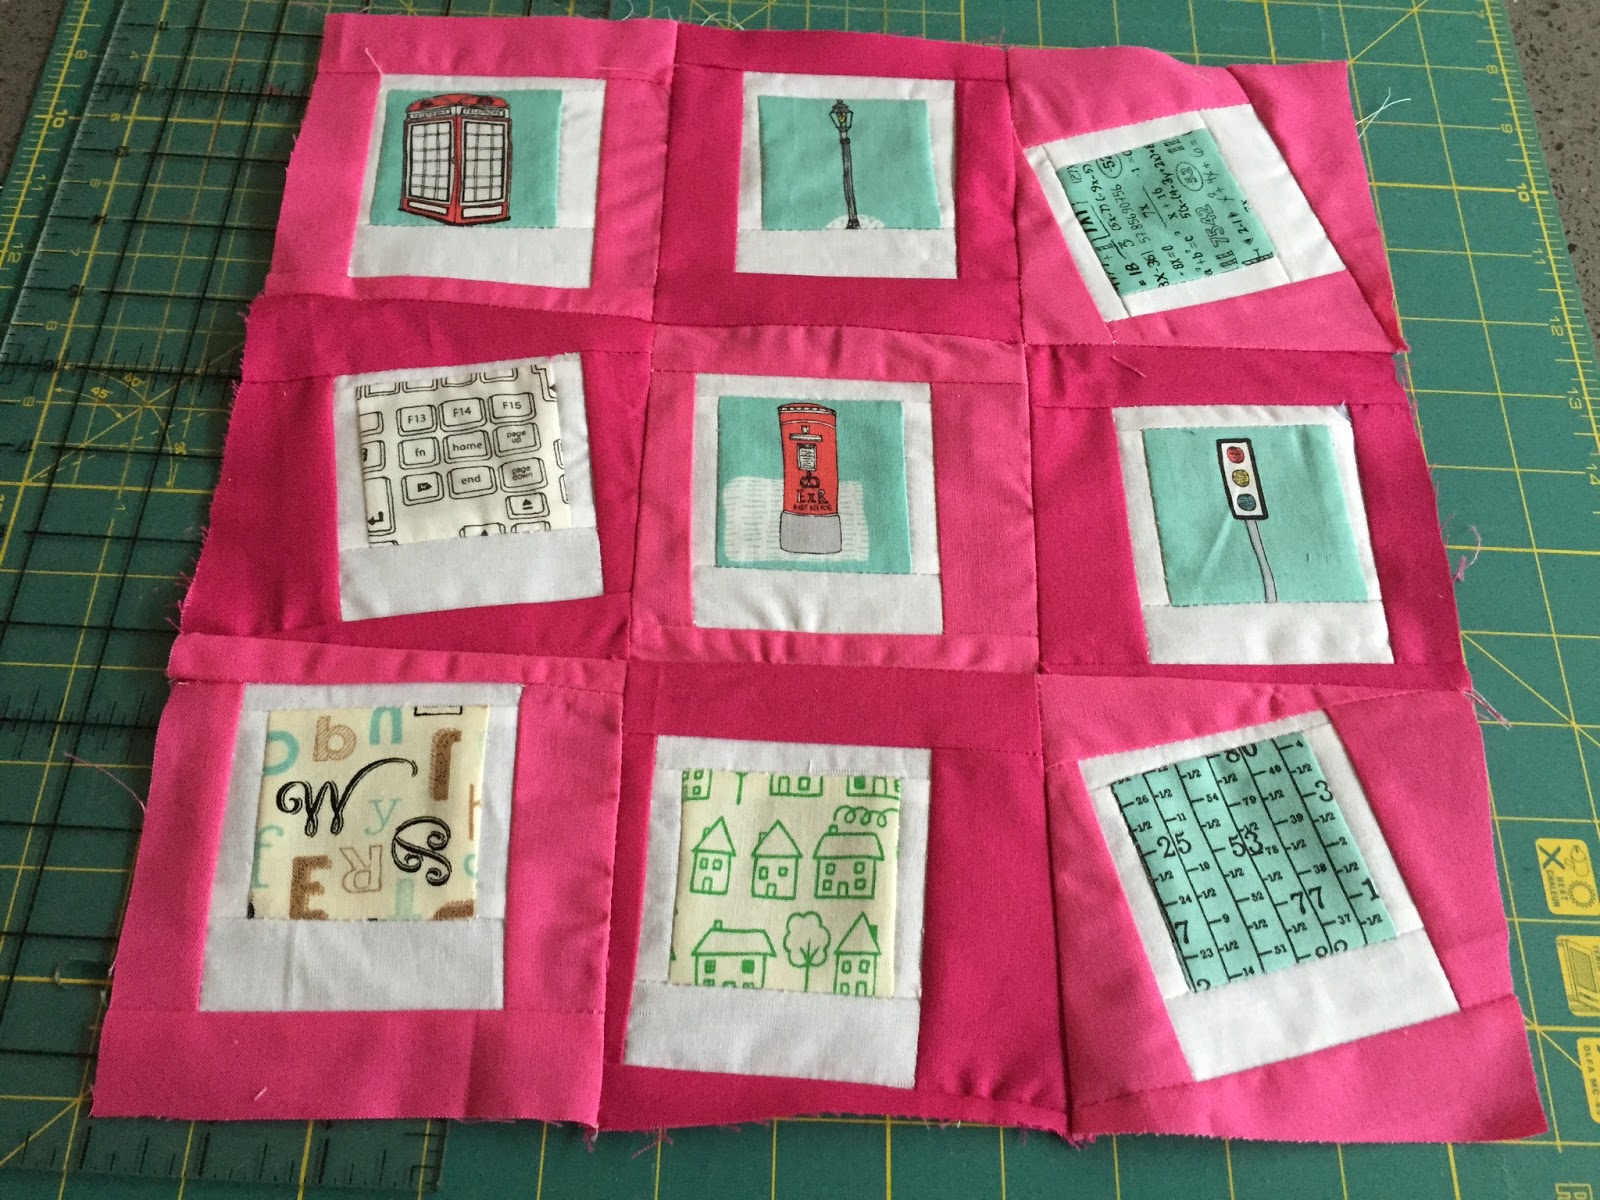 |
| my finished 12.5" block |
I messaged @bossyoz having admiring her polaroid squares on instagram. She had made her squares as part of her scandibee and contacted her Queen Bee Sigrun. Sigrun gave permission for me to attach her word document and link to the tutorial she used. This is the link to the tutorial she, and now I followed from Capitola Quilter. (unfortunately I can't link up Sigrun's word document, but thank you Sigrun). You might find it easier to follow that tutorial than my interpretation. The group have a very active flickr group, follow this link to check out their photos for inspiration. You can also check them out on instagram #scandibee
Firstly a few guidelines.
I would like you to make me 2 squares, each 12.5", that is 12" square plus seam allowances.
I would like the background to be a solid kona type fabric. I don't mind what colour, feel free to mix the colour background as long as they are from the same base colour, ie light pink, mid pink etc.
I don't mind how many photos are in each 12.5" square, you can have 1 large photo, 4, or 9 as I have. I know time is short and precious, I don't expect you to make 9 photo squares, just because I did. It was just my fabrics lent toward that.
The photos can be straight or tilted, slightly up or slightly down in position
The actual photo can be a square polaroid shape or an oblong shape like an I phone. Just remember to keep the bottom deeper than the sides and top.
The photos can be of anything. Mine are themed. Yours can be whatever you want, themed or random. An animal, a household object or even an abstract concept. Whatever you want. The more variety the better.
I would like you to sign the bottom of one of your photos, either stitch or write your name
Now, the method
these instructions are for 9 photos in a square
cut 9 x 2.5" fussy cut, that means a 2.5" square cut so that the design is the focus, centred and hopefully in its entirety.

 |
| how to and how not to fussy cut |
cut 1" white strip, wof (width of fabric) or scraps for the sides and top
cut 1.5" white strip, wof for the bottom
as Jesse J sings, everybody move to the left - chain sew the left side of the 2.5" squares to the 1" strip of fabric, scissor cut and press to the dark side
as Jesse J sings, everybody move to the right - chain sew the right hand side of the 2.5" squares to the 1" strip, scissor cut and press to the dark side.


chain sew a 1" strip to the tops of the squares, trim and press as before
chain sew a 1.5" strip to the bottom of the squares, trim and press to the dark side
your squares should now measure roughly 3.5" by 4". Now we trim them to a width of 3" and a depth of 3.5". I used the 1.5" point on the ruler to line up with the middle of the fussy cut. Measure the depth remembering to keep the bottom white bit the deepest. As long as the overall dimensions are the same, and the bottom is the deepest, the photos don't have to be uniformly centred. Remember variety is good. Why do we trim so much fabric off? We want to keep the white crisp and narrow and it is easier to stitch a broader piece of fabric and trim down then stitch a narrow piece.

Now we move on to the fun bit. (?) We need to add the background. This is where it all becomes a bit looser and more free expression, and maybe a little confusing. We want this white squarish piece of fabric to end up as a 4.5" square, so we make it bigger to 5" x 5.5" by adding borders and then trim down to the required size. This is to give us enough fabric to allow us to tilt it whilst keeping the white corners. Or to place it high up, or low down, whatever takes your fancy. If you have loads of solid and want to tilt, then use 2.5" borders, if you are keeping yours straight and are a careful cutter or are feeling parsimonious then you can use 2" borders.

So, cut your borders and sew on the sides first, then the top and bottom. A word of warning. I used a fq and chain sewed all the sides, I quickly realised I wasn't going to have enough fabric, so a little creative unpicking, cutting and sewing was needed. Those with skimpier borders became the "vanilla" squares, the straight up and down evenly centred squares. Those with more generous borders were tilted, and those without any borders were sewn with a deeper pink border.

To tilt the square, I found the best way was to use a square ruler. Make sure the white border is all enclosed in the square. Cut the first angle, then leave the fabric where it is and turn the board to cut the other sides. If you do inadvertently trim off a white corner, don't worry, use it anyway.

When you have trimmed your 9 squares down to 4.5" squares, sew them in 3 rows of 3. Then attach the middle row to the top row and third row on the bottom. Just try and butt up the seams where it seems appropriate.

C'est Finis. Now you have a square which hopefully measures around 12.5"
If you have any hair left on your head and are feeling generous, it would be fantastic if you could send me an extra fussy cut. I can make these into photo squares to create a fantastic random effect. I'll write your name in the corner of this for you.
If you use 4 photos, I suggest you aim for 4 squares each 6.5", which when sewn together should make 12.5".
My macaroon square has photos of macaroons which were fussy cut smaller at 2" to take advantage of the delicate picture. These still end up at 4.5" square, they just have bigger borders. In fact, they look more like the old slides that were on the go in the 1970s, I like that too.

I had admired this macaroon fabric when Vivienne of greenrabbitdesigns used it as dress fabric for one of her gorgeous bunnies. Vivienne was kind enough to send me some. I do love macaroons, I've eaten loads this summer.

I'm also working on some Liberty flower squares. I love Liberty fabric, flowers and gardens.
I'm also sewing some Japanese based photos, I seem to be drawn towards all things Japanese this year.
And what of the Queen of Sheba? Well ............ when I was married 30 years ago, I wanted to walk down the aisle, or walk up the aisle (I was flexible) to the March of The Queen of Sheba by George Friedrich Handel. It was played often in our church as the congregation left. Anyhow, our organist vetoed it, she asked me, who do you think you are? The Queen of Sheba? Apparently I had to remember I was in God's house and walk down the aisle in a humble, modest manner befitting the occasion. No Bridezillas in our church! Now, if I wasn't going to be the centre of attention the day I married, when would I be? Of course I wanted people to look at me, I was the bride! There was no movement on this at all, the Queen of Sheba was no go. So, do this one thing for me. Go listen to the March of the Queen of Sheba on youtube, and come back and tell me how much you like it.
One last thing, my husband says I should mention the most important bit, how he wanders around the house picking up stray threads and bits of fabric. He has a hard life.
Lastly, thank you everybody and I can't wait for the postman to start delivering!
Helen x
Love The Queen of Sheba music and it's classical for Pete's sake! Now I could see had you wanted "You Sexy Thing" or some such anthem, lol. Sigh. Religious sorts, don't get me going....Love what you have done with your polaroids!
ReplyDeleteI hope you get some really fun Polaroid blocks! :)
ReplyDeleteLove your blocks.
ReplyDeleteMy hubby says your hubby should be grateful it's just bits of stray threads he finds Mine normally finds my lost pins.....in the bottom of his feet.
Yours is the best selfie I've seen in a long time! Brilliant choice for the blocks... your squares with a single theme are really original.
ReplyDeleteYours is the best selfie I've seen in a long time! Brilliant choice for the blocks... your squares with a single theme are really original.
ReplyDeleteYours is the best selfie I've seen in a long time! Brilliant choice for the blocks... your squares with a single theme are really original.
ReplyDelete